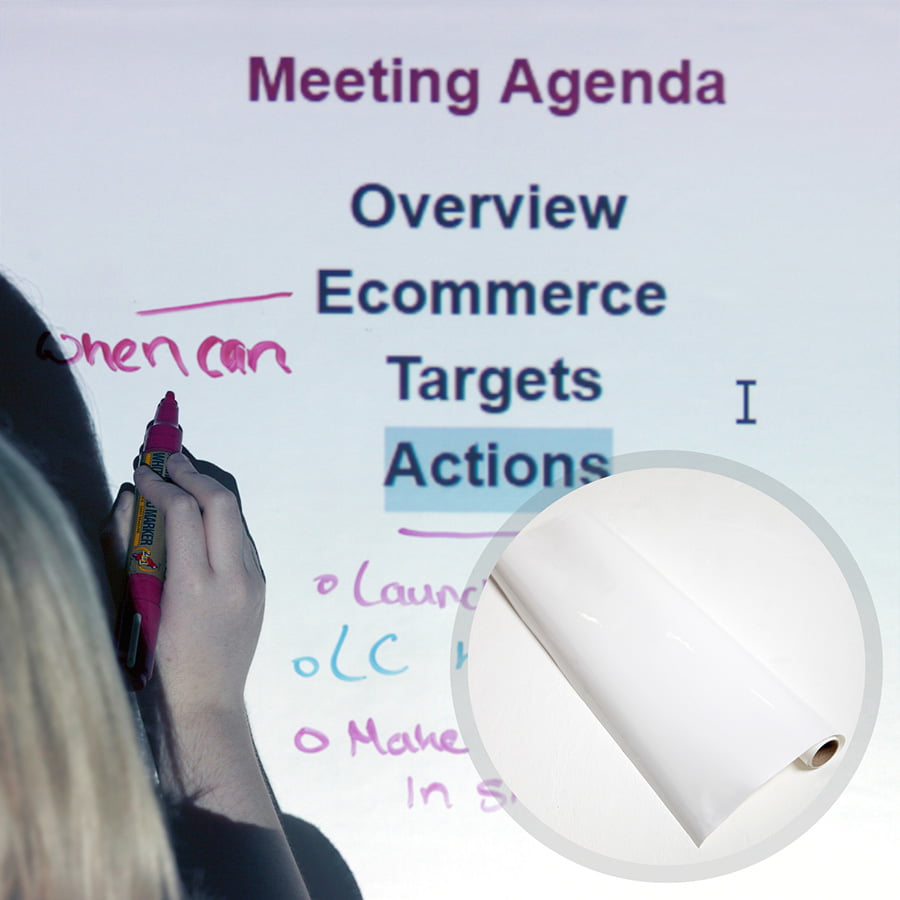













Delivery InformationVolume DiscountsTechnical SpecificationsCustomer ReviewsInstallationBenefits of Using Whiteboard Projector Whiteboard WallpaperEasy Installation, Versatile FunctionalitySmarter Surfaces Projector Whiteboard Wallpaper transforms any flat surfaces like a wall into writable and projectable areas. Create inspiring writable and projection surfaces that encourage collaboration.Empower Your Mind for Greater ProductivityProject presentations, images, and videos seamlessly while writing over them for better collaboration and engagement. Compatible with all projectors, it’s ideal for offices, classrooms, and meeting rooms.Make Every Space a Hub for CreativityConvert any smooth surface into a writable and projectable area. It is perfect for fostering productivity and inspiring creativity. So now write and project directly onto the surface for seamless interaction.Optimized for Natural Light and Guaranteed PerformanceLow sheen finish reduces glare, ensuring optimal readability. Guaranteed durability for 10 years with stain-resistant, non-ghosting surface.Environmentally FriendlyVOC-free, solvent-free, and isocyanate-free, it can be applied safely in the presence of people.Projector Whiteboard Wallpaper - Technical SpecificationsCoverage / Dimensions:10m² / 1.22m x 8.25m5m² / 1.22m x 4.12m2m² / 1.22m x 1.64mProduct Colour: White (RAL: 9016) Product Finish: Low Sheen Gloss Measurement: 41 GU at 60 degrees Gain Value: 1.1 at a viewing angle of 120 degrees Material Thickness – .12” Lighting: Normal ambient lighting Performance: Dry Erase & projection with bright, sharp projection performance Odour: None Environmental (exceeds all EU/Ireland standards): VOC free, solvent free, PFOA & PFOS free and isocyanates free Certification: Independent certification for Fire Suitable Surfaces: walls, plaster, concrete, wood, metal, doors or any smooth surfaceBacked by over twelve years of expertise in whiteboard and projection surface technology, our products deliver trusted performance.Not sure which option suits your needs? Our team is ready to assist you via video call, live chat, phone, or email. Get expert technical guidance, creative ideas, and tailored product recommendations to help you make the right choice.Need installation support? Well, we are here to guide you every step of the way. Kit Contents10m² & 5m²1 x Dry Erase Projection Wallcovering1 x Surface Sticker1 x Application Guide1 x Wallpaper Spatula1 x Pair of gloves1 x Microfibre Eraser2m²1 x Dry Erase Wallpaper1 x Microfibre Eraser Cloth2 x Adhesive Tubes1 x Application GuideProjector Whiteboard Wallpaper ReviewsR Hislop - Staten Island Fitout LLCAwesome product and company works great with our short throw projector. Did exactly as they said it would.Thomas Jefferson High - Fairfax CountyThe wallpaper from Smarter Products has been a highlight of the year for our seniors who were involved in the design of our renovation programmeLead Architect - SBJ Design GroupVery positive experience overall and certainly specify this product again.Explore More Products From Smarter Surfaces(0 Reviews)Smart Self Adhesive Whiteboard Film – Low Sheen From €104.00 ex.VAT Select options This product has multiple variants. The options may be chosen on the product page (0 Reviews)Whiteboard Wallpaper From €135.00 ex.VAT Select options This product has multiple variants. The options may be chosen on the product page (0 Reviews)Magnetic Projector Screen Whiteboard Wallpaper From €261.00 ex.VAT Select options This product has multiple variants. The options may be chosen on the product page (0 Reviews)Magnetic Whiteboard Wallpaper From €219.00 ex.VAT Select options This product has multiple variants. The options may be chosen on the product page FAQ's What is Gain Value?Gain refers to how effectively a projector screen reflects light. It is measured against a standard matte white screen, which has a gain of 1.0. A higher gain value indicates that more light is reflected, producing a brighter image, while a lower gain means less reflection, resulting in a dimmer display.The gain of a screen also affects the viewing angle. High-gain screens focus light more directly toward the centre, creating a narrower viewing angle. This means the image appears brightest when viewed head-on but diminishes from the sides. Low-gain screens, however, distribute light more evenly, offering a wider viewing angle and ensuring better visibility for a broader audience.Selecting the right gain value depends on factors such as ambient lighting, projector brightness, screen size, and seating arrangement. Why is Gain Important for Projector Screens?Gain directly influences image brightness and viewing clarity. It affects how light is reflected, which impacts overall screen visibility and the quality of the viewing experience. Does a Higher Gain always mean a better image?Not necessarily. While a higher gain can enhance brightness from certain angles, it often reduces visibility from wider angles. High-gain screens work best when viewers are positioned directly in front of them but may result in uneven brightness across a larger audience. How do I choose the right gain for my Projector Screen?A standard projector screen gain is 1.0, providing balanced brightness across multiple angles. The ideal gain depends on your viewing environment and setup. Consider factors such as ambient lighting, seating arrangement, and image clarity needs before deciding between high or low gain. What are the benefits of using a high-gain projector screen?High-gain screens enhance image clarity and brightness, making them suitable for specific environments. Key advantages of high-gain projector screens include : • Enhanced Brightness : Reflects more light, ensuring a vivid display, even in well-lit spaces. • Better Contrast in Dark Settings : Improves the depth and detail of darker scenes. • Minimised Ambient Light Reflection : Reduces interference from light sources, such as walls and ceilings. • Ideal for Focused Viewing Areas : Works well when the audience is seated directly in front of the screen. What are the drawbacks of high-gain screens?While high-gain screens offer improved brightness, they also have limitations such as : • Narrower Viewing Angle : Brightness diminishes for viewers seated at an angle. • Uneven Light Distribution : Can cause hotspots where some areas appear overly bright. • Limited Suitability for Large Audiences : Works best for smaller groups seated within a direct line of sight. • Not Ideal for Outdoor Use : The reflective nature may not perform well in uncontrolled lighting conditions. What are the advantages of using a low-gain projector screen?Low-gain screens provide a more uniform and expansive viewing experience, making them ideal for various settings. Their benefits include : • Wider Viewing Angle : Ensures consistent brightness and image quality for larger audiences. • Even Light Distribution : Reduces glare and hotspots, making the display more uniform. • Better for Indoor Use : Works well in controlled lighting environments. • More Comfortable Viewing : Reduces eye strain by softening overly bright images. What are the disadvantages of low-gain screens?While low-gain screens offer excellent viewing flexibility, they have a few downsides which are as follows : • Reduced Brightness : May not be suitable for brightly lit spaces or outdoor use. • Lower Contrast Levels : Darker images may appear less defined in certain lighting conditions. • Some Light Absorption : The screen may absorb part of the projector’s brightness, resulting in a dimmer image. • Not Suitable for High-Ambient Light Areas : Works best in spaces where external light can be controlled. What is the application process of Projection Whiteboard Wallpaper?To apply projection whiteboard wallpaper, all you need to do is thoroughly apply two coats of Smarter Surfaces wallpaper adhesive to the wall.Now simply apply the wallpaper just like any other ordinary wallpaper using a flat plastic edge to push out any air bubbles and trim to size with a sharp knife. You can add more rolls to cover an entire wall by simply pushing two or more rolls together along the edge.See our projection whiteboard wallpaper application video How is Smart Projector Wallpaper applied?A full application guide to help you apply our Smart Projector Whiteboard Wallpaper. Is it possible to apply Smart Projection Whiteboard Wallpaper on different surfaces?Our projection whiteboard wallpaper is designed to be applied on smooth surfaces, including curved walls. However, you must ensure that all debris and previously applied wallpapers are thoroughly removed. Also, the absorbent surfaces must be treated with a primer before the application process. Is it essential to prime the surface before applying the Projection Wallpaper? Well, not necessarily. Only absorbent surfaces require prior treatment with a primer before the application process of the paint. However, if the surface was previously painted, then no primer is required. Is Projection Whiteboard Wallpaper safe?Yes Projection whiteboard wallpaper is absolutely safe. It is completely solvent free, VOC free, isocynates free and PFOA & PFOS free. It also has independent certification for Fire Class A - ASTM E84 and Projection Performance Report – CREST How should I clean my whiteboard surface?You can easily clean your projectable whiteboard using a dry or slightly damp cloth. For effortless maintenance, we recommend using a standard Whiteboard Cleaning Spray. However, if you encounter stubborn stains or tough marks, our Permanent Ink Remover is specifically formulated to restore your surface effectively. Can I use alcohol to clean my Smart Whiteboard Wallpaper - Low Sheen surface? Well, regular use of alcohol on Smart Whiteboard Wallpaper – Low Sheen may compromise the surface’s durability and reduce its performance over time.So to ensure optimal cleaning without affecting surface quality, we recommend using our specially designed cleaning solutions. You can explore our full range of cleaning products for the best results. Can I use permanent markers on Smart Whiteboard Wallpaper – Low Sheen?No, just like all traditional whiteboards, Smart Whiteboard Wallpaper – Low Sheen is not suitable for use with permanent markers. However, if a permanent marker is accidentally applied, then we advise using our Permanent Ink Remover for effective removal. How can I remove permanent marker stains from my whiteboard surface?You may be able to eliminate permanent marker ink by tracing over it with a whiteboard marker. This reactivates the ink, making it easier to wipe away. Allow it to sit for two minutes before wiping clean.If this method does not work, we recommend using our Permanent Ink Remover , available on our website.This specialised cleaner is designed to eliminate permanent marker stains, stubborn marks, and ghosting from whiteboards and Smart Whiteboard Wallpaper – Low Sheen surfaces. Can Smart Projection Whiteboard Wallpaper be used to create a whiteboard surface?Yes, Smart Projection wallpaper is a dual function wallpaper and is used as a whiteboard surface and a projection surface. Are there different sizes available for Projection Whiteboard Wallpaper – Low Sheen (Projector and Wallpaper)?Yes, our Projection Wallpaper is available in a wide array of sizes. So you can opt for your desired size at the shopping cart on the product page. What are the different gloss measurements/levels of Smart Whiteboard Wallpapers? For Smart Whiteboard Wallpaper Low Sheen has a Gloss Measurement of 41 GU at 60 degrees What type of projector can be used with Smart Whiteboard Wallpaper – Low Sheen?Smart Whiteboard Wallpaper – Low Sheen is suitable for use with most projectors, including ultra short throw projectors. Please note: Smart Whiteboard Wallpapers can be used with short throw interactive projectors Can you paint or apply projection wallpaper on top of magnetic plaster?Yes you can apply projection wallpaper on top of your magnetic plaster. Will the surface cause glare or reflection? If you notice a hotspot on the surface, adjust your projector’s angle to remove it.For a surface that combines both projector and whiteboard functionalities, opt for our Smart Projector Whiteboard Wallpaper - Low Sheen. For high performance projection consider our range of specialist projection paints. Projector Whiteboard Wallpaper installationProjector Whiteboard Wallpaper is a convenient, ready-to-use writable projector screen wallcovering that applies effortlessly and is ready within 48 hours. Its flexible design allows installation in various orientations including on curved or rounded walls, though horizontal placement is recommended for optimal usability at eye level.How to Apply Whiteboard WallpaperStep 1: Prepare the Surface Ensure the wall is smooth and free from any cracks or imperfections. Fill gaps, sand the surface, and apply a primer if needed to create an even base.Step 2: Measure and Cut Roll out the wallpaper on a clean surface and measure it to the required length. Use sharp scissors for precise cutting.Step 3: Apply Adhesive Use a roller to spread two coats of adhesive onto the wall. Let the first coat dry to the touch before applying the second.Step 4: Install the Wallpaper Carefully position the wallpaper and use the included spatula or a smooth plastic tool to remove air bubbles and excess adhesive.Step 5: Final Touches Wipe the surface with a damp cloth to remove any residue, ensuring a clean, professional finish.For detailed guidance, refer to our comprehensive application guide or watch our installation video.Want to test it first? Simply request a sample pack to experience the quality before purchasing.Need assistance? Well, our expert team is always available at your disposal. Just reach out to us anytime and we'll be happy to offer our expert advice and support.A full application guide to help you apply our Smart Projector Whiteboard Wallpaper.Projector Whiteboard Wallpaper installation VideoWatch our step-by-step Video Application GuideProjector Whiteboard Wallpaper Videos Creative Professional Teaching Methodology | Upgrade The Learning Experience | Smarter Surfaces
Smart Whiteboard Wallpaper – Low Sheen
$ 94.82
Trusted Solutions
Fast Delivery in 3-5 Days
Insured Shipping
Related products
-

-
 -29%
-29% -

-